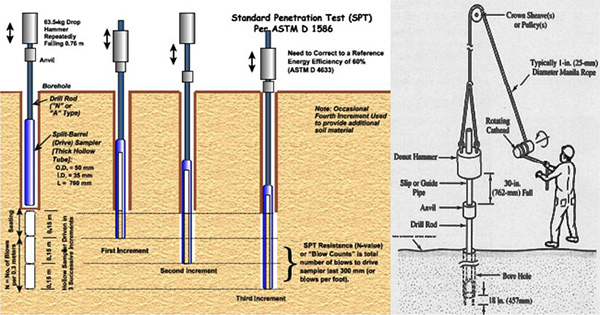
Method of Standard Penetration Test (SPT)

OBJECTIVE
STANDARD PENETRATION TEST (SPT) is undertaken to accomplish typical penetration to achieve the penetration resistance (N-value) along the depth at a specified construction site.
The test is carried out with the following Equipment & Apparatus
- Tripod (to provide an aparent height of about 4 m; one of the legs of the tripod should containladder so that a person can arrive at tripod head.)
- Tripod head with hook
- Pulley
- Guide pipe assembly
- Standard split spoon sampler
- A drill rod for expanding the test to deeper depths
- Heavy duty post hole auger (100 mm to 150 mm diameter)
- Heavy duty helical auger
- Heavy duty auger extension rods
- Sand bailer
- Rope (about 15 m long & strong enough to lift 63.5 kg load repeatedly)
- A light duty rope to operate sand bailer
- Chain pulley block
- Casing pipes
- Casing couplings
- Casing clamps
- Measuring tapes
- A straight edge (50 cm)
- Tool box
The test abides by the following method
1. Recognize the location of testing in the field
2. Construct the tripod in order that the top of the tripod head is primarily situated over the testing spot. This can be reasonably ensured by putting a rope into the pulley attached with the tripod head and preparing the free end of the rope to go down and modifying the tripod legs with the purpose of keeping the rope end at the testing spot. When the tripod legs are constructed and modified, precautions should have been taken so that the load is allocated consistently over the three legs. It is obtained by making sure that the lines which connect the tips of the tripod legs on the ground, develops an equilateral triangle. Besides, make sure that the three legs of the tripod are tightly sustained on the ground (i.e. the soil underneath the legs should not be unfasten as well as should not be based on a sloping rock surface or on a small boulder which may tilt throughout testing.
3. With the use of auger move the bore hole, at the test location for a depth of 0.5 m and clear the loose soil from the bore hole.
4. Cleanse the split spoon sampler and employ a thin film of oil to the inside face of the sampler. Attach an A-drill extension rod to the split spoon sampler.
5. Fall the 63.6 kg weight on to the guide pipe assembly and attach the guide pipe assembly to the other end of the A-drill rod.
6. The chain linked to the driving weight is affixed to the rope that passes by the pulley at the tripod head. The other part of the rope is brought down by hand or applying the mechanical winch. By dragging the rope down, the drive weight, guide pipe assembly, A-drill rod and the split spoon sampler will be constructed vertically.
7. A person should retain the guide pipe assembly split spoon sampler and keep it vertical with the falling weight deflated to the bottom of the guide assembly.
For getting more details, go through the following article.
www.civilblog.org

